2.2.2. Maemo
2.2.2.1. Install
The most up to date maemo package is provided in an external repository. Thus, you need to add it via the application manager:
Name: navit bokomoko
URL: http://bokomoko.de/~rd/maemo
Distribution: unstable/
Components:
After refreshing the application catalogues, you can install it using the application manager (pay attention, that it now should be a SVN version and not just the offical old 0.0.2)
Dont forget about the additional packages, to use all features:
librsvg2-2
librsvg2-common
espeak
2.2.2.2. Map download
You need to get OpenStreetMap packages for map support. Place them for example in a navit folder at your SD card.
2.2.2.3. Configuration
Copy /etc/navit/navit.xml to /home/user/.navit/navit.xml and adapt this file below the home directory.
This basically follows the Configuration instructions. But there are a few platform specific changes nessesary:
2.2.2.4. old
2.2.2.4.1. General instructions
Install Navit. There are various sources:
Navit on Maemo.org with point-and-click-installer (this will add a repository on the tablet this keeping you updated with the newest versions).
The deb packages also can be downloaded via the download section of navit-project.org
Navit requests the file libcrypto.so.0.9.7, but an up to date N810 uses the updated version 0.9.8. To use Navit, you need to make a symlink like this: ln /usr/lib/libcrypto.so.0.9.8 /usr/lib/libcrypto.so.0.9.7
Get maps:
For European users, Marco Polo Grosser Reiseplaner could be a choice, as the project will gain a little income from your purchase.
openstreetmap is a community driven, wiki like world map. There are several sources where you can download Navit maps based on openstreetmap data.
It is possible to use Garmin maps
Configure Navit by editing its XML configuration file, e.g. in xTerm:
Search for the file navit.xml as superuser root
Create a folder called
.navitin your user directoryCopy navit.xml there and edit it
Replace the path to the map file to fit your device and configuration:
<mapset enabled="yes">
   <map type="binfile" enabled="yes" data="/media/mmc2/map/planet.bin"/>
</mapset>
2.2.2.4.3. Keep Display Lit
At this time Navit does not offer a method for keeping the display lit while moving. The best way to work around this is to change the display settings on the tablet itself so it stays lit while charging. Then purchase a small car adapter to keep the tablet charged while in the car and the display will stay lit while driving. It is also recommended to get a car adapter because using the GPS receiver will generally drain the batteries faster.
Note that some car adapters might be able to provide enough power to run the tablet but not necessarily enough to charge the battery. The tablet will think it’s being charged and the display will stay lit but it will either take a long time to charge the battery or the battery might not charge at all. When purchasing a charger ensure that it is rated to deliver the same power as the wall adapter to avoid this situation.
2.2.2.4.5. Configuration options
Navit offers several GUIs. If you are not pleased with the GTK GUI, maybe you want to use the “internal” GUI. You can switch it on via the navit.xml configuration file.
The n810 for driving is best used with the internal GUI. it is not entirely obvious how to configure the OSD options required to show information. The way to configure navit changed in Navit svn1979 The below is an example of laying out the information on an n810
<osd enabled="yes" type="text" label="${vehicle.position_speed}" x="5" y="46" font_size="800"
   w="200" h="55" align="4" background_color="#1b0877cc"/>
<osd enabled="yes" type="text" label="ETA: ${navigation.item.destination_time[arrival]}" x="-220"
   y="46" font_size="500" w="215" h="40" align="4" background_color="#1b0877cc"/>
<osd enabled="yes" type="text" label="Left to Go" x="-175" y="87" font_size="400" w="170" h="40"
   align="4" background_color="#1b0877cc"/>
<osd enabled="yes" type="text" label="${navigation.item.destination_length[named]}" x="-200" y="128"
   font_size="550" w="195" h="40" align="4" background_color="#1b0877cc"/>
<osd enabled="yes" type="text" label="${navigation.item.destination_time[remaining]}" x="-200"
   y="169" font_size="550" w="195" h="40" align="4" background_color="#1b0877cc"/>
<osd enabled="yes" type="text" label="In ${navigation.item[1].length[named]} " x="-320" y="-86"
   font_size="650" w="235" h="45" align="4" background_color="#1b0877cc"/>
<osd enabled="yes" type="navigation_next_turn" x="-85" y="-106" font_size="500" w="80" h="65"
   background_color="#1b0877cc"/>
<osd enabled="yes" type="text" label="onto ${navigation.item[1].street_name}" x="-555" y="-40"
   font_size="550" w="550" h="35" align="4" background_color="#1b0877cc"/>
<osd enabled="yes" type="text" label="${navigation.item.street_name}
   Max:${tracking.item.route_speed}" x="5" y="5" align="0" background_color="#1b0877cc" font_size="550"
   w="790" h="40"/>
<osd enabled="yes" type="gps_status" x="5" y="101" w="50" h="40" background_color="#1b0877cc"/>
<osd enabled="yes"  type="button" x="5" y="-120" command="zoom_in()" src="gui_zoom_in.png"/>
<osd enabled="yes"  type="button" x="60" y="-60" command="zoom_out()" src="gui_zoom_out.png"/>
<osd enabled="yes"  type="button" x="5" y="-60" command="gui.fullscreen()" src="gui_fullscreen.png"/>
<osd enabled="no" type="speed_warner" x="-60" y="180" w="60" h="60"/>
<osd enabled="no" type="button" x="0" y="0" command="gui_internal_menu" src="menu.xpm"/>
gives: 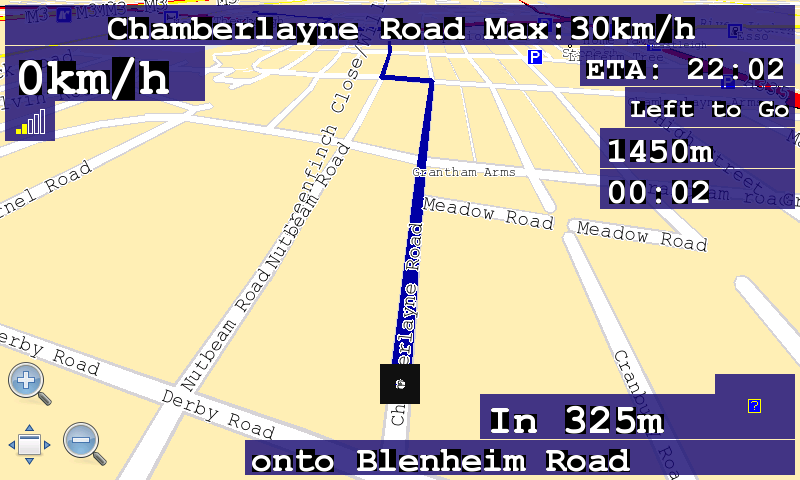
Note the above linewraps are added to make it display nicely, but you’ll want each osd items as a single line in the navit.xml file The important settings are w (width) and h (height) which allow you to set the boxes big enough to then use a large font. I’m using 550 point to be able to comfortably read the information whilst I’m driving. Also this layout only looks right full screen.
The new style has type=”text” which are effectively free text fields that understand \n for newline and a number of variables which get switched for information values. eg ${navigation.item.destination_time[arrival]} shows the time at which you are expected to arrive at destination. All the text is added for my own preference as a first pass. Please add additional layout variations that you’d like to share.
To make updating this item easier, and maybe sharing different OSD setups easier you can replace the OSD entries in navit.xml with:
<xi:include href="/home/user/.navit/navitOSD.xml"/>
Then you can create a new file navitOSD.xml in which you place all the OSD items. This means you can create and share layouts by providing just the navitOSD.xml file and people can drop them into place without having to hand edit their navit.xml files. The same trick will work for any subset part of the navit.xml file
I’ll try to update this when I figure out new settings, and keep it showing a reasonable setup for the n810
—Daniel Would
Here’s another option with each item in its’ own text box. The layout also works without overlaping when in windowed mode.
<osd enabled="yes" type="compass" x="5" y="5" font_size="250" w="60" h="62" background_color="#48852faf"/>
<osd enabled="yes" type="gps_status" x="70" y="5" w="50" h="40" background_color="#48852faf"/>
<osd enabled="yes" type="text" label="${vehicle.position_sats_signal}/${vehicle.position_qual}" x="70"
   y="45" font_size="300" w="50" h="22" align="0" background_color="#48852faf"/>
<osd enabled="yes" type="text" label="${vehicle.position_speed}" x="5" y="72" font_size="400" w="115"
   h="35" align="4" background_color="#48852faf"/>
<osd enabled="yes" type="text" label="ETA: ${navigation.item.destination_time[arrival]}" x="5" y="-220"
   font_size="400" w="170" h="30" align="4" background_color="#1a6ad780"/>
<osd enabled="yes" type="text" label="Left to Go" x="5" y="-185" font_size="400" w="170" h="30" align="4"
background_color="#1a6ad780"/>
<osd enabled="yes" type="text" label="${navigation.item.destination_length[named]}" x="5" y="-150"
   font_size="400" w="170" h="30" align="4" background_color="#1a6ad780"/>
<osd enabled="yes" type="text" label="${navigation.item.destination_time[remaining]}" x="5" y="-115"
   font_size="400" w="170" h="30" align="4" background_color="#1a6ad780"/>
<osd enabled="yes" type="text" label="In ${navigation.item[1].length[named]} " x="5" y="-40"
   font_size="500" w="235" h="35" align="4" background_color="#000000c8"/>
<osd enabled="yes" type="navigation_next_turn" x="245" y="-45" font_size="500" w="60" h="40"
   background_color="#000000c8"/>
<osd enabled="yes" type="text" label="onto ${navigation.item[1].street_name}" x="310" y="-40"
   font_size="500" w="485" h="35" align="4" background_color="#000000c8"/>
<osd enabled="yes" type="text" label="${navigation.item.street_name}" x="150" y="5"  font_size="500"
   w="500" h="35" align="0" background_color="#ff71004b"/>
<osd enabled="yes" type="button" x="-60" y="0" command="zoom_in()" src="gui_zoom_in.png"/>
<osd enabled="yes" type="toggle_announcer" x="-65" y="95" w="60" h="60" background_color="#1a6ad700"/>
<osd enabled="yes" type="button" x="-60" y="200" command="gui.fullscreen()" src="gui_fullscreen.png"/>
<osd enabled="yes" type="button" x="-60" y="-105" command="zoom_out()" src="gui_zoom_out.png"/>
gives:
This gives a nice display with (to me) similar information grouped by color. However, the text can be difficult to read, so I have changed all the background colors to 000000c8. Very readable and still slightly transparent.
The speaker icon is to toggle the announcer on/off (color is 00000000, transparent), but isn’t working at this time.
I am also using some changes suggested by Daniel Would which change the navigation to same size as the street, and place the blue line on top of the street.
—lemmyslender
Here is a third option. This is designed for full screen mode but will work okay in windowed mode with some minor overlap of the compass. Note that the text sizes for all map labels was increased by 4 points to make the street names easier to read on the tablet. To accomplish this please reference the following link Configuration. The link also shows how you can change the font types used for labels for easier reading.
<osd enabled="yes" type="compass" x="-110" y="-60" font_size="250" w="60" h="60" background_color="#000000c8"/>
<osd enabled="yes" type="gps_status" x="-50" y="-60" w="50" h="40" background_color="#000000c8"/>
<osd enabled="yes" type="text" label="${vehicle.position_sats_signal}/${vehicle.position_qual}" x="-50" y="-20"
   font_size="250" w="50" h="20" align="0" background_color="#000000c8"/>
<osd enabled="yes" type="text" label="${vehicle.position_speed}" x="0" y="-60" font_size="400" w="110" h="60"
   align="4" background_color="#000000c8"/>
<osd enabled="yes" type="text" label="ETA: ${navigation.item.destination_time[arrival]}" x="110" y="-30"
   font_size="300" w="170" h="30" align="4" background_color="#000000c8"/>
<osd enabled="yes" type="text" label="${navigation.item.destination_length[named]}" x="280" y="-30"
   font_size="300" w="170" h="30" align="4" background_color="#000000c8"/>
<osd enabled="yes" type="text" label="${navigation.item.destination_time[remaining]}" x="450" y="-30"
   font_size="300" w="240" h="30" align="4" background_color="#000000c8"/>
<osd enabled="yes" type="text" label="In ${navigation.item[1].length[named]} " x="0" y="0" font_size="500"
   w="245" h="40" align="4" background_color="#000000c8"/>
<osd enabled="yes" type="navigation_next_turn" x="245" y="0" font_size="500" w="60" h="40" background_color="#000000c8"
   icon_src="$NAVIT_SHAREDIR/xpm/%s_wh_48_48.png" />
<osd enabled="yes" type="text" label="Onto ${navigation.item[1].street_name}" x="305" y="0" font_size="500"
   w="495" h="40" align="4" background_color="#000000c8"/>
<osd enabled="yes" type="text" label="${navigation.item.street_name}" x="110" y="-60"  font_size="500"
   w="580" h="30" align="0" background_color="#000000c8"/>
<osd enabled="yes" type="button" x="-60" y="50" command="zoom_in()" src="gui_zoom_in.png"/>
<osd enabled="yes" type="toggle_announcer" x="-65" y="130" w="60" h="60" background_color="#1a6ad700"/>
<osd enabled="yes" type="button" x="-60" y="220" command="gui.fullscreen()" src="gui_fullscreen.png"/>
<osd enabled="yes" type="button" x="-60" y="-120" command="zoom_out()" src="gui_zoom_out.png"/>
gives: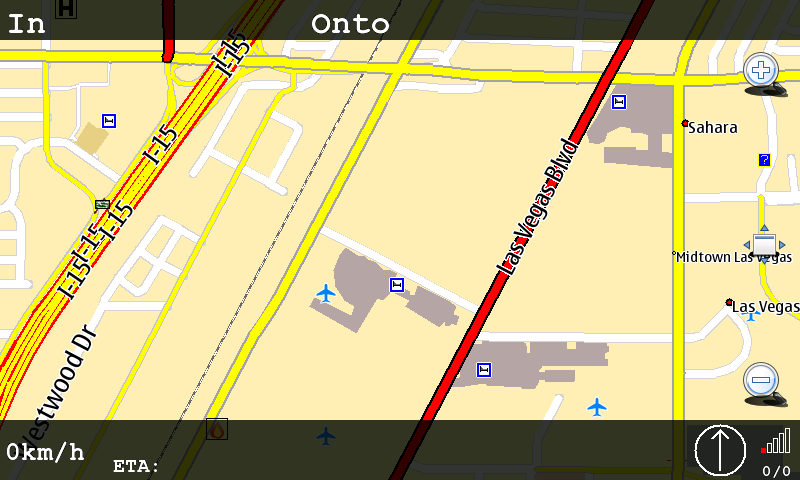
—SLAM-ER
2.2.2.4.6. N900 instructions
Download this, unzip it to ~.navit/ and everything should work (you only need to download some maps and either edit maps.xml or name them as I named them). Note that to test speaking, you need GPS lock first. You may want to made adjustments to the setup, look around this wiki and have a look at this maemo forum thread.
gives: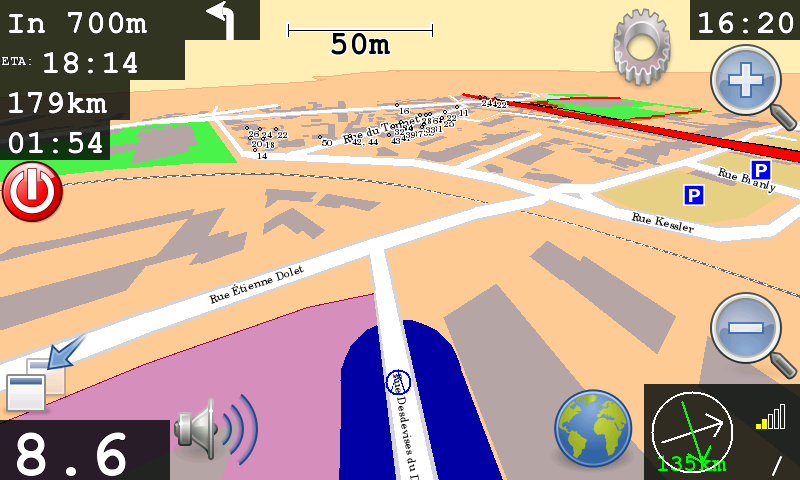
2.2.2.4.7. Icon source setting for OSD
The N8x0 platform (and possibly others) is not very supportive of .svg image files. Navit on the other hand relies heavily on svg. The result is often missing images from your display. In the examples above you may need to replace the .svg with .png. The solution for Next Turn is to use the following config addition:
<osd enabled="yes" type="navigation_next_turn" x="325" y="-135" w="150" h="100" align="15"
background_color="#a60c0f00" icon_src="$NAVIT_SHAREDIR/xpm/%s_wh_48_48.png" />
Note the icon_src parameter specifies the template for the image file names. This should work for all OSD items.
2.2.2.4.8. Using Tracks
It is possible to make Navit recording and displaying a track. First let Navit record the track in the vehicle section, then add the resulting file to the mapset section:
<log type="textfile" data="/home/user/.navit/tracks/ActiveLog.txt" flush_size="1000" overwrite="30" />
...
<map type="textfile" enabled="yes" data="/home/user/.navit/tracks/ActiveLog.txt"/>
2.2.2.4.10. Starting GPSd manually
Navit does not necessarily start the GPS subsystem (driver and gpsd) on the Tablet. Therefore you need to do this by starting another application (Map, Gpxview) which is capable of starting it. This “helper application” needs to run as long as you want to use Navit.
As of SVN 1843 (Dec 19, 2008) Navit for N800 will autostart gpsd if your GPS BT receiver is on. For N810 this will work with the internal GPS receiver as well.
2.2.2.4.11. Starting GPSd automatically
Some additional details (Nov 28, 2008): I spent an evening getting Navit working on my N800, here are what else you need to do on Diablo with a Bluetooth GPS
Install bluez-utils-test, have to get this from a Chinook repository for now
Follow the instructions here 2
As of SVN 1843 (Dec 19, 2008) Navit for N8x0 will autostart gpsd for
you, at least on the device itself. If you are running Navit under
Scratchbox then you will need to get gps data from somewhere. On the
ARMEL target, there does not seem to be a way to connect to gpsd
running elsewhere. If running under the X86 target, running gpsd
under your native OS will allow gps data to get to Navit.
2.2.2.4.12. Notes
The navit project has a project page on the maemo garage site, https://garage.maemo.org/projects/navit/. But we are considering discontinuing this as it duplicates most or all of what this wiki is about.
The first binary version of navit for the Internet Tablets was created on another site, http://www.tecdencia.net/navit/.
We (dwould, gerritv) are now one of the admins for http://maemo.org/downloads/product/OS2008/navit/. In the 2 hours since this was activated for Click To Install from the daily SVN, there were already 7 downloads!
osd enabled=”yes” type=”text” label=”In ${navigation.item[1].length[named]} “ x=”-320” y=”-86”
`` font_size=”650” w=”235” h=”45” align=”4” background_color=”#1b0877cc”/>``
osd enabled=”yes” type=”text” label=”${navigation.item.destination_time[remaining]}” x=”-200”
`` y=”169” font_size=”550” w=”195” h=”40” align=”4” background_color=”#1b0877cc”/>``