TomTom development
Porting libraries
Several libraries need are needed by Navit and must be ported as well.
zlib
Get the zlib source from http://zlib.net/. zlib’s configure script does not support selecting the host system via –host, so we need to set a few environment variables by hand before we can compile zlib:
export CC=arm-linux-gcc
export CXX=arm-linux-g++
export LD=arm-linux-ld
export NM="arm-linux-nm -B"
export AR=arm-linux-ar
export RANLIB=arm-linux-ranlib
export STRIP=arm-linux-strip
export OBJCOPY=arm-linux-objcopy
export LN_S="ln -s"
Now we can configure, make and install:
./configure --prefix=$PREFIX
make
make install
This has been tested with zlib 1.2.5. Older versions require AR to bet set to “arm-linux-ar -r” instead. Before proceeding, make sure to reset it to arm-linux-ar because the “-r” switch is needed only by these old zlib versions and will cause conflicts compiling the other libraries.
libxml2
This one is rather straightforward. Simply download the source from ftp://xmlsoft.org/libxml2/, configure (disable Python as this may cause problems), make and install:
./configure --prefix=$PREFIX --host=arm-linux --without-python
make
make install
libpng
The libpng source can be downloaded from http://sourceforge.net/projects/libpng/files/. I recommend using libpng-1.2.xx - I have tried 1.4.xx before but that one didn’t work. Configure, make and install:
./configure --prefix=$PREFIX --host=arm-linux
make
make install
libjpeg
Get the libjpeg source from http://sourceforge.net/projects/libjpeg/files/ - the current version (which worked for me) should be 6b. It seems to rely on the directory $PREFIX/man/man1 to be present, so we need to create this if it is not already present. Configure, make and install:
mkdir -p $PREFIX/man/man1
./configure --prefix=$PREFIX --host=arm-linux
make
make install
libfontconfig
fontconfig can be obtained from http://fontconfig.org/release/. This one is again very simple:
./configure --prefix=$PREFIX --host=arm-linux --with-arch=arm
make
make install
glib
Cross compiling glib is a bit tricky. First, we need the sources from http://ftp.gnome.org/pub/gnome/sources/glib/. The configure script tries to probe some characteristics of the host machine by compiling a few test programs and running them - which will fail when a cross compiler is used. We therefore need to set the results of these tests by hand. In the glib source directory, create a file named tomtom.cache with the following contents:
glib_cv_long_long_format=ll
glib_cv_stack_grows=no
glib_cv_uscore=no
ac_cv_func_posix_getgrgid_r=yes
ac_cv_func_posix_getpwuid_r=yes
Make this file read-only to keep configure from overwriting it, configure, make and install.
chmod a-w tomtom.cache
./configure --prefix=$PREFIX --host=arm-linux --cache-file=tomtom.cache
make
make install
tslib
These instructions are based on http://www.opentom.org/Tslib. First, we need the tslib source from the SVN repository:
svn co svn://svn.berlios.de/tslib/trunk/tslib tslib
Before compiling, we need to patch the source a bit: Open the file plugins/input-raw.c in the tslib source directory and search for EVIOCGRAB. You will find several occurences of EVIOCGRAB, each of them within some if-statement. Enclose these if-statements with #ifdef EVIOCGRAB … #endif, so that you get something like this:
#ifdef EVIOCGRAB
  if(...)
  { ... EVIOCGRAB .... }
#endif
We also need to edit the config file etc/ts.conf. For older TomToms, uncomment the line “module_raw h3600”, so the file should look like this:
# Uncomment if you wish to use the linux input layer event interface
# module_raw input

# Uncomment if you're using a Sharp Zaurus SL-5500/SL-5000d
# module_raw collie

# Uncomment if you're using a Sharp Zaurus SL-C700/C750/C760/C860
# module_raw corgi

# Uncomment if you're using a device with a UCB1200/1300/1400 TS interface
# module_raw ucb1x00

# Uncomment if you're using an HP iPaq h3600 or similar
module_raw h3600

# Uncomment if you're using a Hitachi Webpad
# module_raw mk712

# Uncomment if you're using an IBM Arctic II
# module_raw arctic2

module pthres pmin=1
module variance delta=30
module dejitter delta=100
module linear
The new TomTom versions (ONE, XL) require a different driver. For these devices, uncomment “module_raw input” instead. Finally, use autogen.sh to create a configure script, configure, make and install.
./autogen.sh
./configure --prefix=$PREFIX --host=arm-linux
make
make install
SDL
The recipe for compiling libSDL is based mainly on http://www.opentom.org/LibSDL and http://www.opentom.org/Talk:LibSDL. First, get the source from http://www.libsdl.org/download-1.2.php. Unfortunalety we can’t compile it out of the box, because the “fbcon” driver which we will use on TomTom relies on the presence of a virtual console, which is not present on TomTom Linux. Therefore, we have to patch the SDL source, using the patch from http://tracks.yaina.de/source/sdl-fbcon-notty.patch. After applying the patch, configure (disabling most of the unneeded drivers), make and install:
./configure --prefix=$PREFIX --host=arm-linux \
 --disable-esd --disable-joystick --disable-cdrom --disable-video-x11 \
 --disable-x11-vm --disable-dga --disable-video-x11-dgamouse \
 --disable-video-x11-xv --disable-video-x11-xinerama --disable-video-directfb \
 --enable-video-fbcon --disable-audio CFLAGS="$CFLAGS -DFBCON_NOTTY"
make
make install
The “-DFBCON_NOTTY” invokes the patch mentioned above and removes fbcon’s dependence on a virtual console. If you like, you can also compile the test applications, as these are quite useful for testing whether libSDL works:
cd test
./configure --prefix=$PREFIX --host=arm-linux
make
make install
SDL_Image
This one is rather easy again. Get the source from http://www.libsdl.org/projects/SDL_image/, configure, make and install:
./configure --prefix=$PREFIX --host=arm-linux
make
make install
Installing Navit
Creating directories
We can now put the compiled libraries and the Navit executable, as well as some config files and, of course, some maps, to a TomTom device. Connect the TomTom device to your computer. You should see a new hard drive. In the following, let’s assume this hard drive can be found in /media/TOMTOM. We then need two directories on the TomTom disk, navit and SDKRegistry. If they don’t exist yet, create them:
cd /media/TOMTOM
mkdir -p navit SDKRegistry
Within the navit directory, create the following directories: bin, lib, share, sdl and ts.
cd navit
mkdir -p bin lib share sdl ts
Now these directories have to be filled with content.
Installing libraries
Put all the libraries you just compiled into the lib directory. Be aware that TomTom uses a FAT file system which isn’t aware of symlinks, so you will have to copy / rename libraries instead of symlinking them. You should end up with something similar to these files:
libSDL-1.2.so
libSDL.so
libSDL_image-1.2.so
libSDL_image.so
libfontconfig.so
libfreetype.so
libgio-2.0.so
libglib-2.0.so
libgmodule-2.0.so
libgobject-2.0.so
libgthread-2.0.so
libpng.so
libpng12.so
libts-1.0.so
libts.so
libxml2.so
It seems that TomTom’s compiler toolchain contains some libraries which are not present on the TomTom devices, so you may need to copy the following libraries as well:
librt.so
libthread_db.so
Installing tslib
We already copied the tslib library into the navit/lib folder in the previous step. But in order to use tslib, we still need the config file telling tslib which driver to use. Copy it into navit/ts:
cp $PREFIX/etc/ts.conf /media/TOMTOM/navit/ts/
tslib comes with some utilities for touchscreen devices, such as calibration and testing tools. When you followed the procedure described above for compiling and installing tslib, you can find them in $PREFIX/bin - easily recognizable, because their names start with “ts_”. If you wish to use them on your TomTom, simply copy them into the navit/ts folder:
cp $PREFIX/bin/ts_* /media/TOMTOM/navit/ts/
In order to run them, you will need a small wrapper script which sets some environment variables before executing the actual utility. For example, the following script will run the calibration utility and then start a simple test program:
#!/bin/sh

cd /mnt/sdcard

export LD_LIBRARY_PATH=$LD_LIBRARY_PATH:/mnt/sdcard/navit/lib

export TSLIB_CONSOLEDEVICE=none
export TSLIB_FBDEVICE=/dev/fb
export TSLIB_TSDEVICE=/dev/ts
export TSLIB_CALIBFILE=/mnt/sdcard/navit/ts/pointercal
export TSLIB_CONFFILE=/mnt/sdcard/navit/ts/ts.conf
export TSLIB_PLUGINDIR=/mnt/sdcard/navit/lib/ts

/mnt/sdcard/navit/ts/ts_calibrate
/mnt/sdcard/navit/ts/ts_test
Here, /dev/fb is the frame buffer device, and /dev/ts is the touchscreen. Newer TomTom versions (ONE, XL) have the touchscreen at /dev/input/event0 instead. In this case you need to change the corresponding line to:
export TSLIB_TSDEVICE=/dev/input/event0
To run this script, create a file named ts.cap in the SDKRegistry directory with the following contents:
Version|100|AppName|ts-wrapper|AppPath|/mnt/sdcard/navit/ts/|AppIconFile||AppMainTitle|Touchscreen|AppPort||COMMAND|CMD|hallo||Touchscreen|This will create an entry named “Touchscreen” in TomTom’s main menu.
Installing SDL utilities
If you have compiled the SDL test applications along with libSDL, place them in the navit/sdl folder on your TomTom device, as well as the *.bmp, *.wav , *.xbm, *.dat and *.txt files from the folder named test in the libSDL source directory. Before running any of these utilities, we need to set some environment variables. The overall procedure is very similar to the tslib utilities mentioned above. You need to create a wrapper script which with the following lines in it:
export LD_LIBRARY_PATH=$LD_LIBRARY_PATH:/mnt/sdcard/navit/lib

export SDL_NOMOUSE=1
export SDL_FBDEV=/dev/fb
export SDL_VIDEODRIVER=fbcon
Add a line with the command that should be executed by the script. Put this file into the navit/sdl folder on your TomTom device. Finally, you need to create an entry in Navit’s main menu. Place a file named sdl.cap in the SDKRegistry with the following contents:
Version|100|AppName|sdl-wrapper|AppPath|/mnt/sdcard/navit/sdl/|AppIconFile||AppMainTitle|SDL-Utility|AppPort||COMMAND|CMD|hallo||SDL-Utility|Replace “sdl-wrapper” with the name of your wrapper script, if necessary.
Installing Navit binaries, plugins and icons
Put the Navit executable into the bin folder:
cp $PREFIX/bin/navit /media/TOMTOM/navit/bin/
In order to run Navit, we need to create a short wrapper script, which will set a few environment variables before running the actual Navit executable. Create a file named navit-wrapper in the bin directory with the following contents:
#!/bin/sh

cd /mnt/sdcard

# Set some paths.
export PATH=$PATH:/mnt/sdcard/navit/bin
export LD_LIBRARY_PATH=$LD_LIBRARY_PATH:/mnt/sdcard/navit/lib
export HOME=/mnt/sdcard/
export NAVIT_LIBDIR=/mnt/sdcard/navit/lib/navit
export NAVIT_SHAREDIR=/mnt/sdcard/navit/share

# tslib requirements.
export TSLIB_CONSOLEDEVICE=none
export TSLIB_FBDEVICE=/dev/fb
export TSLIB_TSDEVICE=/dev/ts
export TSLIB_CALIBFILE=/mnt/sdcard/navit/ts/pointercal
export TSLIB_CONFFILE=/mnt/sdcard/navit/ts/ts.conf
export TSLIB_PLUGINDIR=/mnt/sdcard/navit/lib/ts

# SDL requirements.
export SDL_MOUSEDRV=TSLIB
export SDL_MOUSEDEV=$TSLIB_TSDEVICE
export SDL_NOMOUSE=1
export SDL_FBDEV=/dev/fb
export SDL_VIDEODRIVER=fbcon
export SDL_AUDIODRIVER=dsp

# fontconfig requirements
export FC_CONFIG_DIR=/mnt/sdcard/navit/fonts
export FONTCONFIG_DIR=/mnt/sdcard/navit/fonts
export FC_CONFIG_FILE=/mnt/sdcard/navit/fonts/fonts.conf
export FONTCONFIG_FILE=/mnt/sdcard/navit/fonts/fonts.conf
export FC_DEBUG=0

# Set language.
export LANG=en_US.utf8

# Run Navit.
/mnt/sdcard/navit/bin/navit /mnt/sdcard/navit/share/navit.xml 2>/mnt/sdcard/navit/navit.log
The first few lines tell Navit where it can find binaries, libraries, plugins and map icons. The middle part tells tslib which touchscreen device to use, and where to place calibration data. For newer TomToms, the touchscreen device is at /dev/input/event0, so the corresponding line needs to be changed to:
export TSLIB_TSDEVICE=/dev/input/event0
The following lines tell libSDL to use the touchscreen as mouse input, to hide the mouse pointer and to use the framebuffer. The last lines set Navit’s language and run the Navit executable. stderr is redirected into a log file, since there is usually no console available to view debugger output.
You may have noticed the presence of a “NAVIT_LIBDIR” in the wrapper script. This is where Navit will look for plugins, so we put the plugins right there:
cp -r $PREFIX/lib/navit /media/TOMTOM/navit/lib/
Next, copy the images used by Navit to display POIs, as well as the navit config file into the share folder, and create a folder for installing maps:
cd /media/TOMTOM/navit/share
cp -r $PREFIX/share/navit/xpm ./
cp $PREFIX/share/navit/navit.xml ./
mkdir -p maps
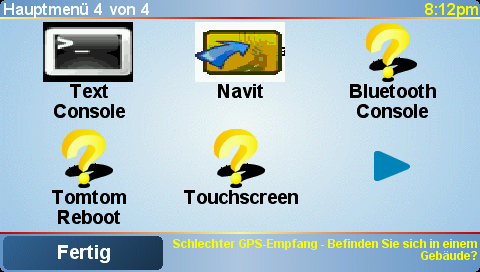
TomTom menu with Navit icon.
In order to start Navit from TomTom’s graphical menu, we finally have to add a menu button. Create a file named navit.cap with the following contents in /media/TOMTOM/SDKRegistry:
Version|100|AppName|navit-wrapper|AppPath|/mnt/sdcard/navit/bin/|AppIconFile|navit.bmp|AppMainTitle|Navit|AppPort||COMMAND|CMD|hallo|navit.bmp|Navit|In the same directory, place a simple 48 * 48 pixel, 24 bit bitmap file named navit.bmp with a fancy Navit icon or whatever you like. If you are happy without such an icon, you can omit this step and delete the two “navit.bmp” entries from the file above:
Version|100|AppName|navit-wrapper|AppPath|/mnt/sdcard/navit/bin/|AppIconFile||AppMainTitle|Navit|AppPort||COMMAND|CMD|hallo||Navit|Installing maps
Any navigation software would be useless without maps. See the Maps section for maps you can use with Navit. Put them into the directory /media/TOMTOM/navit/share/maps which you have just created.
Additional helpful tools
It is often useful to run programs from a console. For a simple console running on TomTom devices, have a look at TomTom Console. It seems not to run an all TomTom devices and software versions, so you may try using Btconsole instead, which allows you to login to your TomTom device via bluetooth.
Things to be done
There are quite a few things that still need to be done:
porting gpsd